
BEST TYPE OF STRETCHING FOR BEGINNERS
-
Hurdler Stretch

This basic stretch is perfect for targeting one leg at a time, and is great for those with really tight hamstrings.
Step by step:
- Sit on the floor and straighten your left leg in front of you. Bend the right knee, placing the sole of your right foot against your left inner thigh.
- Fold over your left leg, keeping your back straight. Hold for 30 seconds, then switch legs.
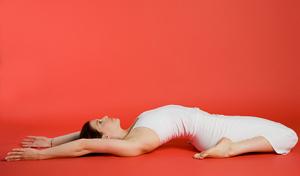
· Plow Stretch
Plow Pose reduces backache and can help you get to sleep.

Plow Pose: Step-by-Step Instructions
- From Salamba Sarvangasana, exhale and bend from the hip joints to slowly lower your toes to the floor above and beyond your head. As much as possible, keep your torso perpendicular to the floor and your legs fully extended.
- With your toes on the floor, lift your top thighs and tailbone toward the ceiling and draw your inner groins deep into the pelvis. Imagine that your torso is hanging from the height of your groins. Continue to draw your chin away from your sternum and soften your throat.
- You can continue to press your hands against the back torso, pushing the back up toward the ceiling as you press the backs of the upper arms down, onto your support. Or you can release your hands away from your back and stretch the arms out behind you on the floor, opposite the legs. Clasp the hands and press the arms actively down on the support as you lift the thighs toward the ceiling.
- Halasana is usually performed after Sarvangasana for anywhere from 1 to 5 minutes. To exit the pose, bring your hands onto your back again, lift back into Sarvangasana with an exhalation, then roll down onto your back, or simply roll out of the pose on an exhalation.
· Shoulder Stand

Increase circulation, boost metabolism, and burn fat faster with this inversion pose
Prep: Seated Forward Bend
Begin in a seated position with legs extended long and together and arms relaxed on either side. Take a big inhale. On the exhale, fall forward, pulling navel to spine and extending hands toward feet as much or as little as feels good on legs and lower back. Allow head to relax down toward legs. (If hamstrings are tight, soften knees.) Breathe here for as long as it feels good.
Prep: Legs Up
When you are ready to come out, one vertebra at a time, roll up and then onto back, keeping soft knees. Bend knees and place feet on the floor with arms on either side. Soften knees and press arms into the ground to reach feet up toward the ceiling. Breathe here for as long as is comfortable.
Prep: Modified Plow
When you feel comfortable, allow feet to fall back behind you an amount that feels good on your neck.
Prep: Plow Pose
Reach feet to the ground for plow pose. Clasp hands together on the ground and wiggle shoulders underneath you one at a time. Press firmly into arms, reach through heels, and breathe here for at least 3 deep breaths.
Prep: Egg Pose
From plow or modified plow, place hands on lower back for support and try to keep elbows about shoulder-width apart. Soften legs and allow knees to rest on forehead in an egg shape. Breath here for as long as is comfortable.
Shoulder Stand
When you feel steady, reach feet toward ceiling one at a time, lengthening legs when you feel comfortable. Breathe here for at least 3 deep breaths. To come down, slowly soften knees toward forehead, come back to plow, and slowly lower back to mat one vertebra at a time.
· Hero Stretch
Virasana is a balm for tired legs at the end of the day, as well as an alternative to Lotus for seated meditation.
How to Do the Hero Stretch
- Begin by kneeling. Take your feet wider than your knees/hips and keep them pointing straight back, don’t allow them to turn in(sickle).
- From here you’ll have three options.
- Option 1, see if you can comfortably bring the butt to the floor between the feet as shown in the top left photo then do so. You are not sitting on the heels, or slouching like in the bottom left photo, the sit bones are on the floor. If this is very uncomfortable or causing pain, take…
- Option 2(top right photo) by sitting on a block/book. If this is still uncomfortable you can take a rolled blanket and put it behind the knees, or just fold the blanket and place it on top of the block for added height.
- Feet are still to the outside of the block/hips pointing straight back. In either option sit tall, reach the crown of the head to the ceiling, pulling the low belly in towards the spine and up towards the ribs, engaging the core.
- The hands can rest on the thighs palm down. If this stretch is causing you too much pain in the knees then stop. I would advise to keep working with the previous weeks stretches until the thighs loosen up more. If you are very flexible here and can sit comfortably on the floor then you can deepen the stretch withoption 3.
- Option 3is to start bringing the hands behind your hips, fingers face forward as shown in the top left photo. Leaning back, push the heart to the ceiling, keeping the chest open and shoulders down the back.
- You can even come to your forearms or all the way down to your back as shown in the bottom right photo, but make sure you only go as far as the knees will stay on the floor.
- Don’t let the knees pop up, squeeze the thighs together and zip up the front of the body (low belly to spine and up) to protect the low back. If you come all the way to the floor you can lift the arms over head grabbing the elbows for an added stretch in the abdominals, ribs, and chest.
You can stay here for 30secs to a full minute. As you begin to loosen up you can work up to five minutes.
Tip: if you are having pain in the ankles you can roll up another blanket/towel and place it in-between the floor and the ankles before you sit back to cushion.
Special Instructions
Stretch to the point of “mild discomfort,” not to the point of pain. Never bounce. Keep the abdominals pulled in tightly and your pelvic bone slightly tucked under. Pull your shoulders away from your ears. This is a good compliment to the “Camel Stretch.”
References:
https://www.popsugar.com/fitness/photo-gallery/1983373/image/20673113/Modified-Hurdler-Stretch
https://www.yogajournal.com/poses/plow-pose
